May 6, 2013

How to Make a Cool Photo Slideshow as Your Mother’s Day Gift with Blaze Video Magic Ultimate


Mother’s Day is right around the corner! What gift you will prepare for your mom? Making a photo slideshow with the precious memories of your families will be a great idea. Let’s see how to make a photo slideshow with Blaze Video Magic Ultimate.

Full Guides

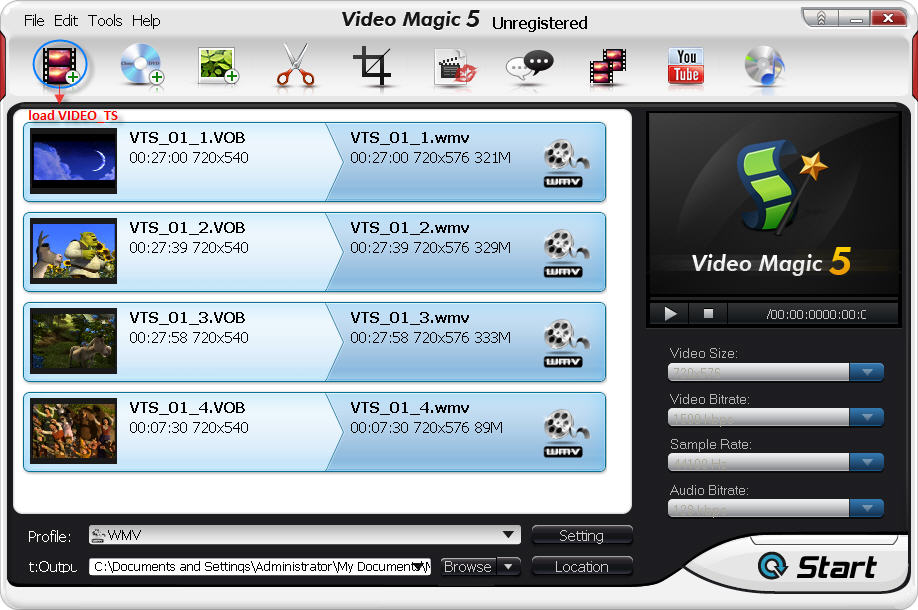
Step 1. Open Slideshow Maker in Video Magic Ultimate.
Free download Blaze Video Magic Ultimate, install it on your Windows computer according to its installation wizard. Launch it and click on the “Slideshow” button on the above of user interface. You will open the Slideshow Maker box.

Step 2. Prepare photo collections.
Save all the photo collections that store the most precious memory of your mother’s into one folder group on your PC hard drive.

Step 3. Drag these photos into the working area.
Click on the “Add” button in the Slideshow Maker box and select the prepared photos to import. You can also adjust the picture positions in your slideshow by clicking on the Move Right or Move Left buttons.

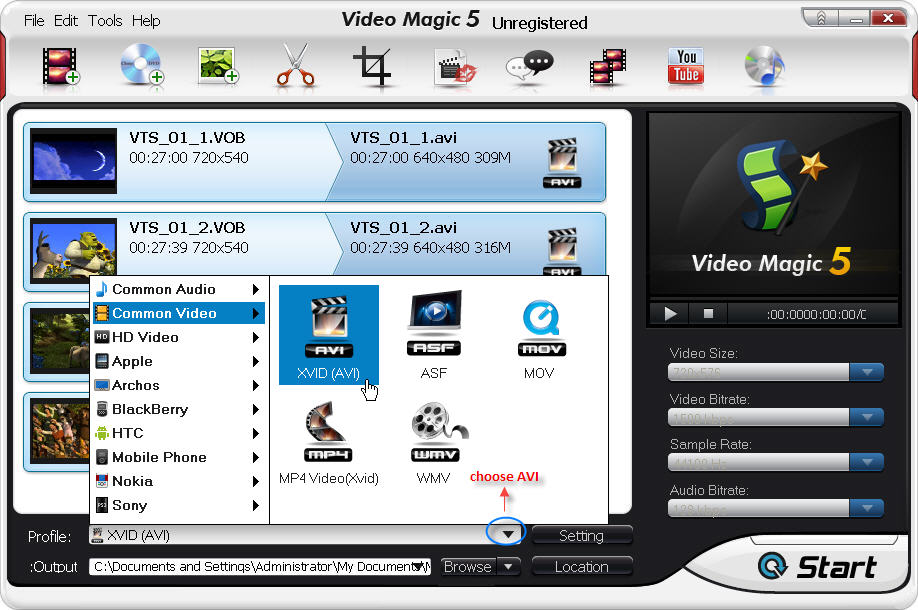
Step 4. Customize your photo slideshow.
Make your photo slideshow unique by adding descriptions as titles and credits to help mom recall these happy days. Also you can manually select the amazing playback effects from the 12 built-in effects including Circle in, Circle out, Masaic, Move left, Move right, Move up, Move down, Shutter vertical, Shutter horizontal, Fade, Clockwise, Anti-clockwise, or choosing Random.

Step 5. Add background music for your photo slideshow.
Choose your mother’s favorite song as background music. After all, happiness is the best gift!

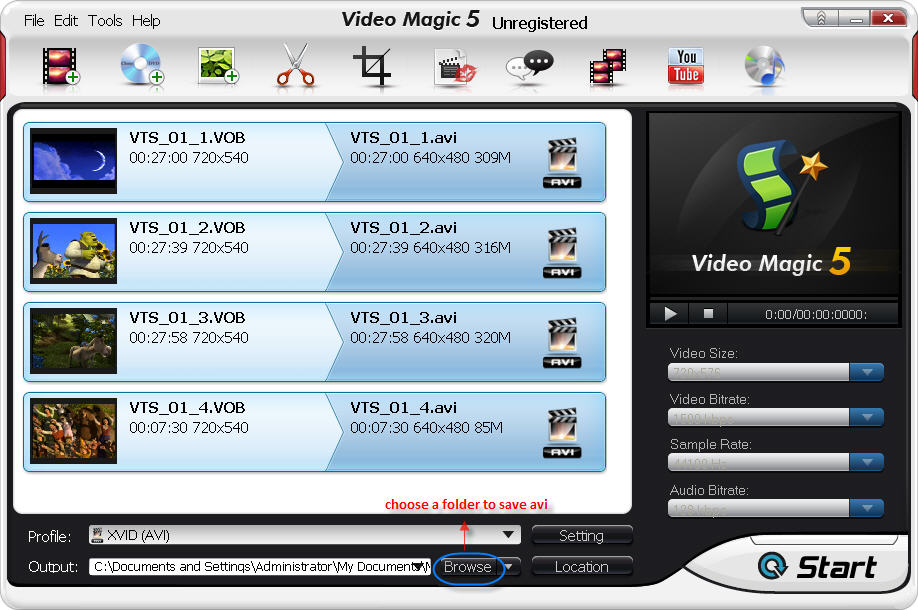
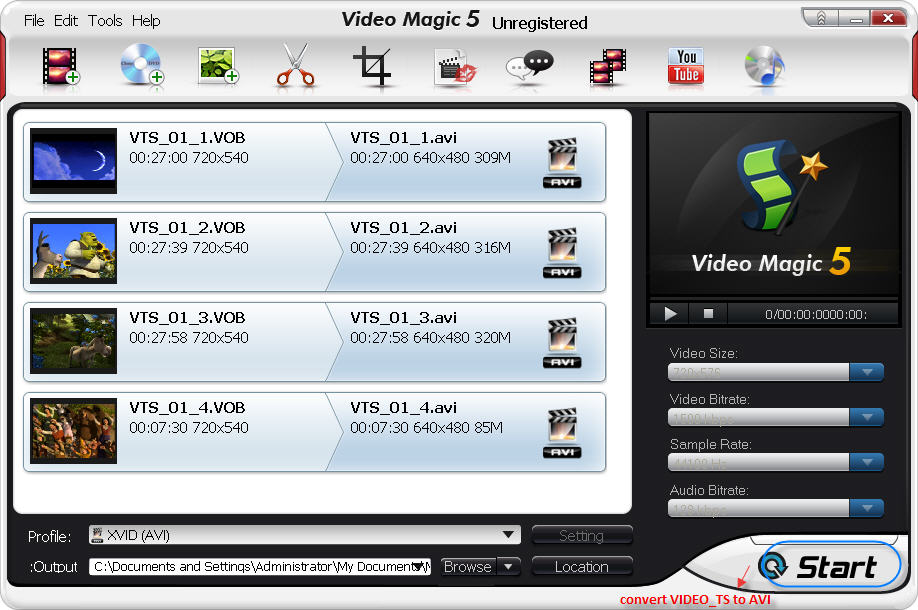
Step 6. Make your photo slideshow gift for mom.
Everything is ready now. Click on the “Create Movie” button on the lower right corner. Your gift for mom will be finished in seconds! 

Jul 19, 2012

How to Convert VIDEO_TS to AVI with BlazeVideo VIDEO_TS to AVI Converter?


If you have created some VIDEO_TS files and would like to encode them to AVI format, chances are that you want to edit DVD videos or play them on some media players. A VIDEO_TS folder holds IFO, BUP and VOB files that contain DVD video data. It can be played normally in a DVD player but not mobile devices.
To convert VIDEO_TS to AVI, a converter which can deal with VIDEO_TS file conversion is the best choice. With a VIDEO_TS to AVI converter, your conversion work is no more complicated and boring.Video Magic is a good one which can deal with VIDEO_TS file with the best quality. Here, I take Windows OS as an example to show you how to convert VIDEO_TS to AVI.
Convert VIDEO_TS to AVI on Windows
Step 1 Load your VIDEO_TS file by clicking “Add File(s)“. Batch conversions are allowed!
load-video_ts-file
Step 2 Choose AVI as output format by clicking “Common Video – > XVID (AVI)”.
choose-avi-as-output-format
Step 3 You can reset the output folder for saving the converted files by clicking “Output – > Browse“.
choose-a folder-to-save-avi-files
Step 4 Click “Start” to begin the VIDEO_TS to AVI conversion. After a while you will get the AVI videos.
convert-video_ts-to-avi
Besides the impressive VIDEO_TS to AVI conversion function, Video Magic additionally support you to edit your files to mix your own flavor in the videos. You can get more information about this VIDEO_TS to AVI converter here !
Related Knowledge
What is VIDEO_TS?
VIDEO_TS, short for video transport stream, is one folder of most video DVDs. Most video DVDs have two folders in the root directory: AUDIO_TS and VIDEO_TS. A typical VIDEO_TS folder contains all the DVD’s video data and playback information, including .VOB (video object) files, .IFO (information) files and .BUP (backup) files.
What is AVI?
AVI means Audio Video Interleave, is a multimedia container format introduced by Microsoft in November 1992 as part of its Video for Windows technology. AVI files can contain both audio and video data in a file container that allows synchronous audio-with-video playback.

Jul 16, 2012

How to Edit Video and Share with Your Friends or on Youtube?


In the former post “How to Convert Your Pictures into a Short Movie”, I have talked about how to turn pictures into a video. In this post, I will tell you how to edit the videos and share them online or with your friends.

HOW TO CONERT YOUR PICTURES INTO A SHORT MOVIE BY VIDEOFLICK:

Step 1: Import Picture/Video

Click the “Import Picture/Video” on the left corner and find the folder where you place the photos you want to make for the video. Select it and click “OK”. (It’s same to import videos.)

Step 2: Edit Video

Click on the video you want to edit. Enter the editing interface by clicking the “Edit” button below or choose from the above category “Edit”. After entering the editing interface, you can crop your video into the right size. You can also add watermark to your video. After finishing editing works, click “OK” to save it.
In addition: There is also a “Clip” function you may use. If you do not like some beginning or ending part, you can clip them. What’s more, you can take some snapshot.

Step 3: Share Videos Online or by Email or Greeting Cards

You can share your videos to your friends by send an email. Click the “Email” button, then you will be lead to the below interface. Fill the form and then send the video out.

VideoFlick provides four kinds of Greeting Cards styles which can be used to decorate your videos. You can choose one and then share it by emails.

If you want to upload your video to YouTube, you can click the “Share” button and choose YouTube upload. It’s safe to fill in your login ID and password here. If you want to use another ID to upload, just double click the “YouTube” Logo.

Besides sharing online, you can also convert your videos onto more portable devices. This is the big feature other video editor or sharing tool do not have. VideoFlick is a leading photo&video editing and sharing software. We provide complete features that other consumers do not have, such as burning video to CD and making pictures into DVD or Album.